As a DAWNer, you are able to contribute in making this website a better place. By default, your content will have to be reviewed by an admin, but if you're a regular contributor, there's no problem in having your privileges increased to be able to submit directly.
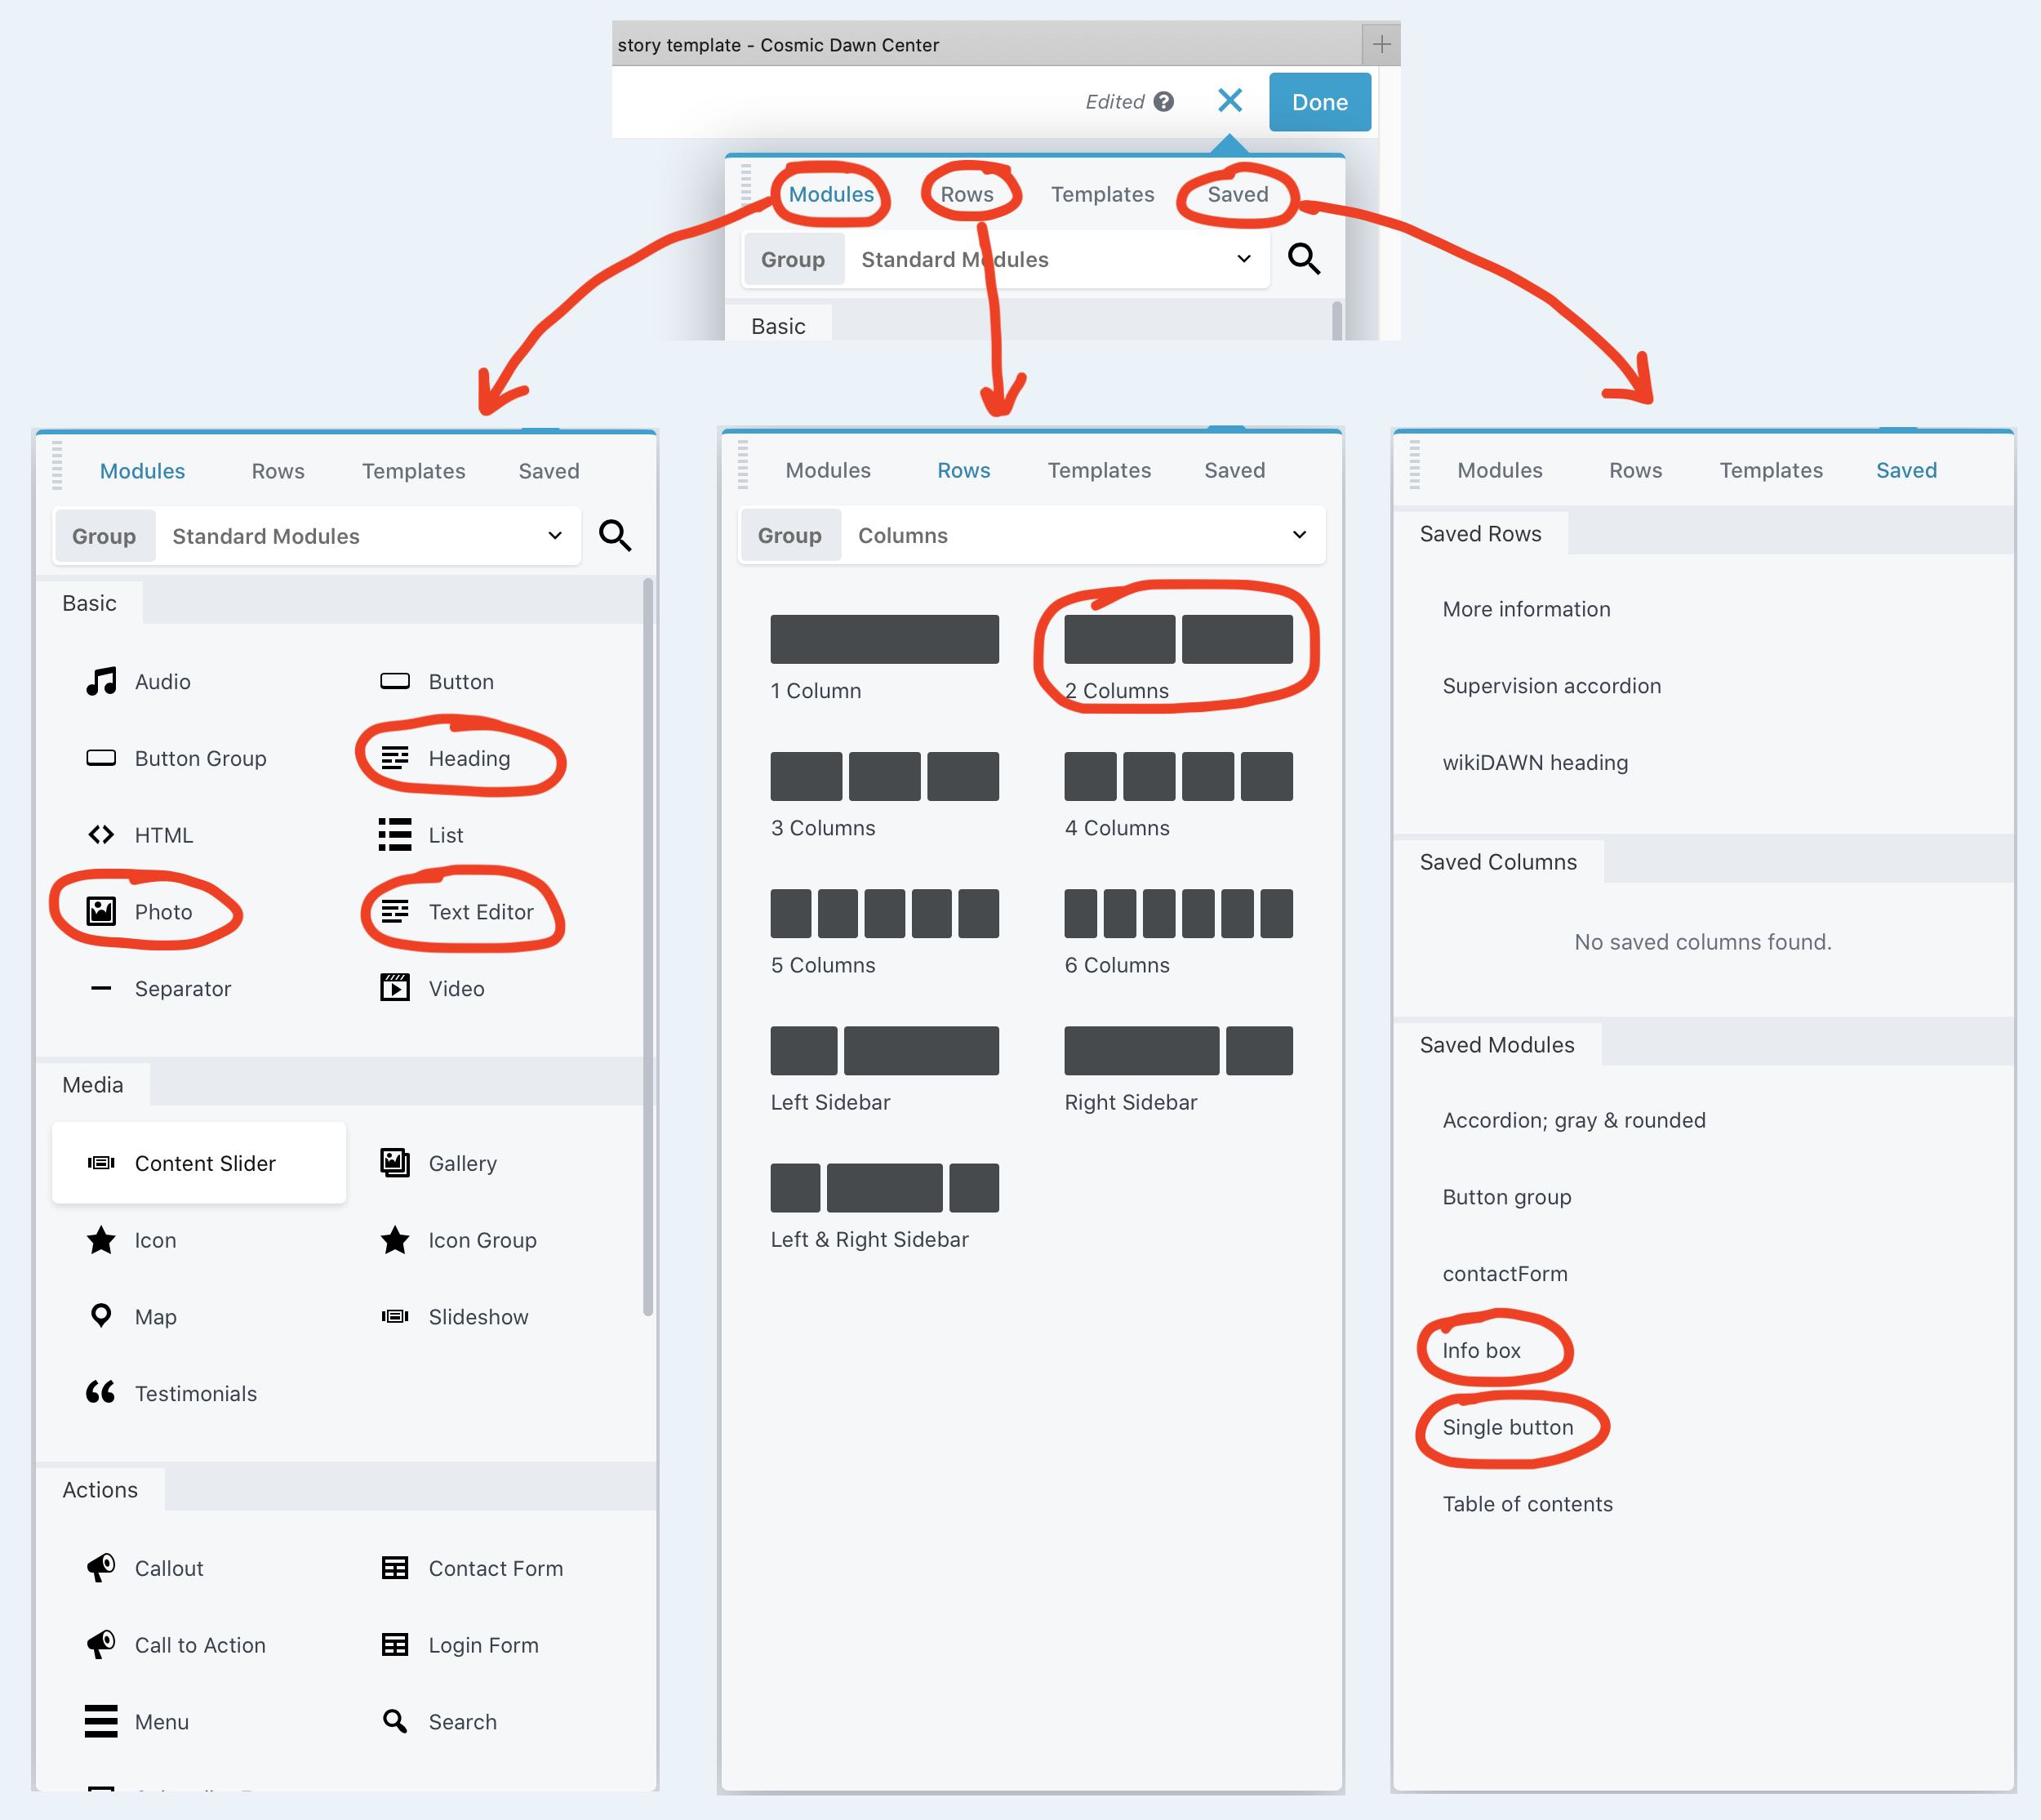
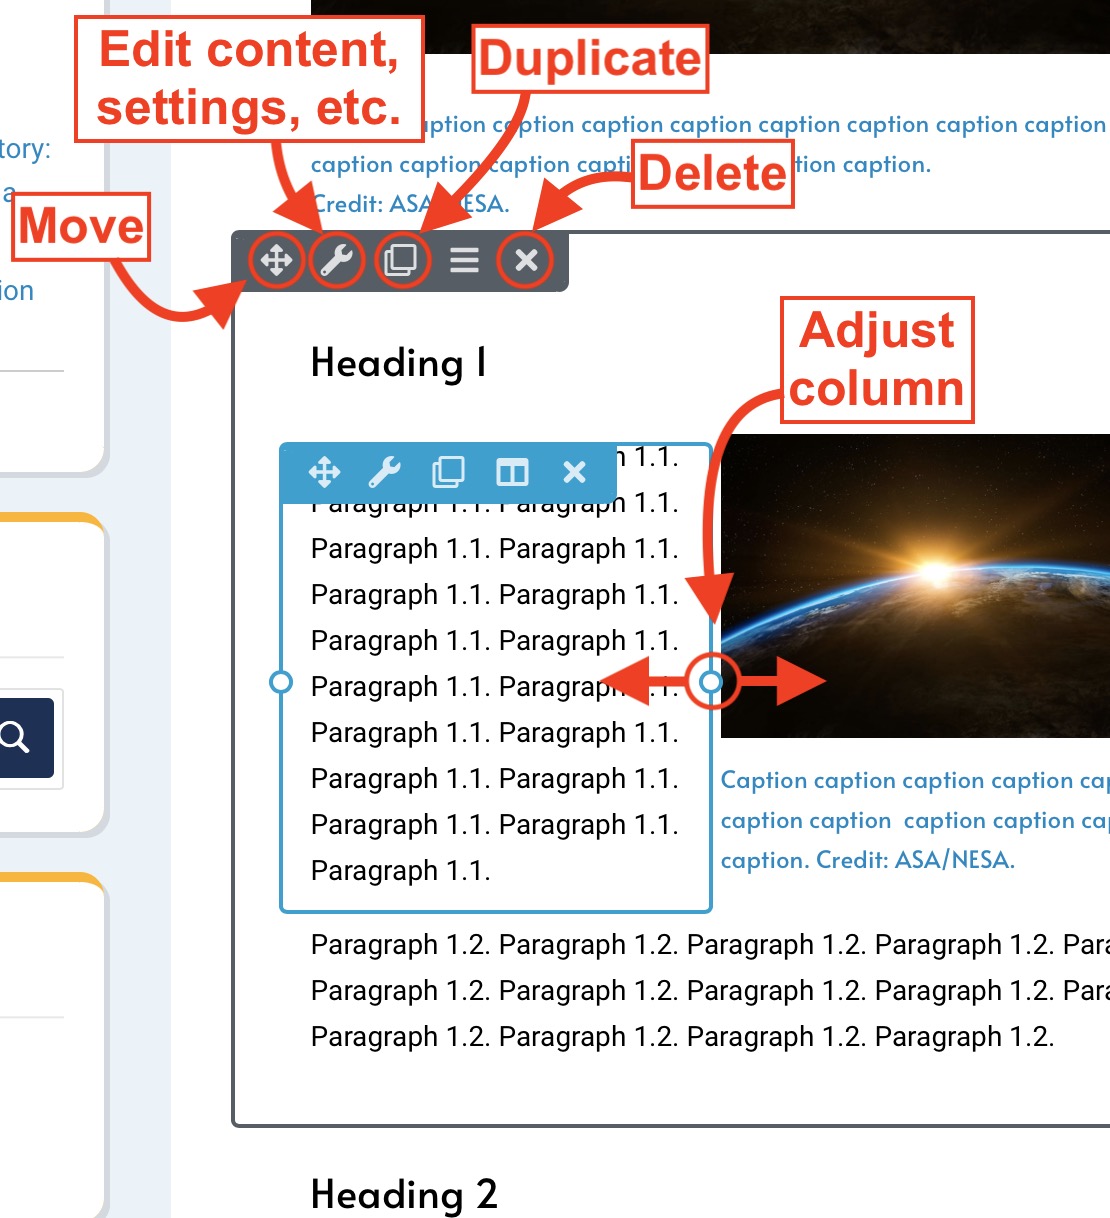
Posts and pages are edited primarily in the Beaver Builder drag-and-drop page builder, although some meta information is edited in WordPress' built-in editor. The first time you use these editors, you'll be offered a guide, but I've tried to make the guides below so that you don't really need to go through this. If you're happy with how the templates look, you can more or less just click-and-edit. If you want more fancy stuff, here's an ultra-quick crash course in Beaver Builder:
Events: Adding an events in the calendar
- From your dashboard, go to
- Events → Add New
- Add information in the appropriate fields. The most important ones are in bold face:
- Title
- Permalink (if you want another URL than suggested)
- Event date and time
- Possibly "Organizer contact info"
- Some text in the Text Editor (e.g. title and abstract for a talk)
- Category/ies (e.g. "Talks at DAWN")
- Possibly tags (e.g. "Reionization" if that's what the talk is about.
- Possibly a Featured Image (e.g. an image of the speaker)
- Hit Publish
Journal Club: Editing the history
The DAWN Journal Club is our weekly paper discussion session. To add the current week's discussed papers, follow this guide:
- Log in to the DAWN website.
- Go to the Journal Club page.
- In the top bar, click "Beaver Builder" (do not click "Edit").
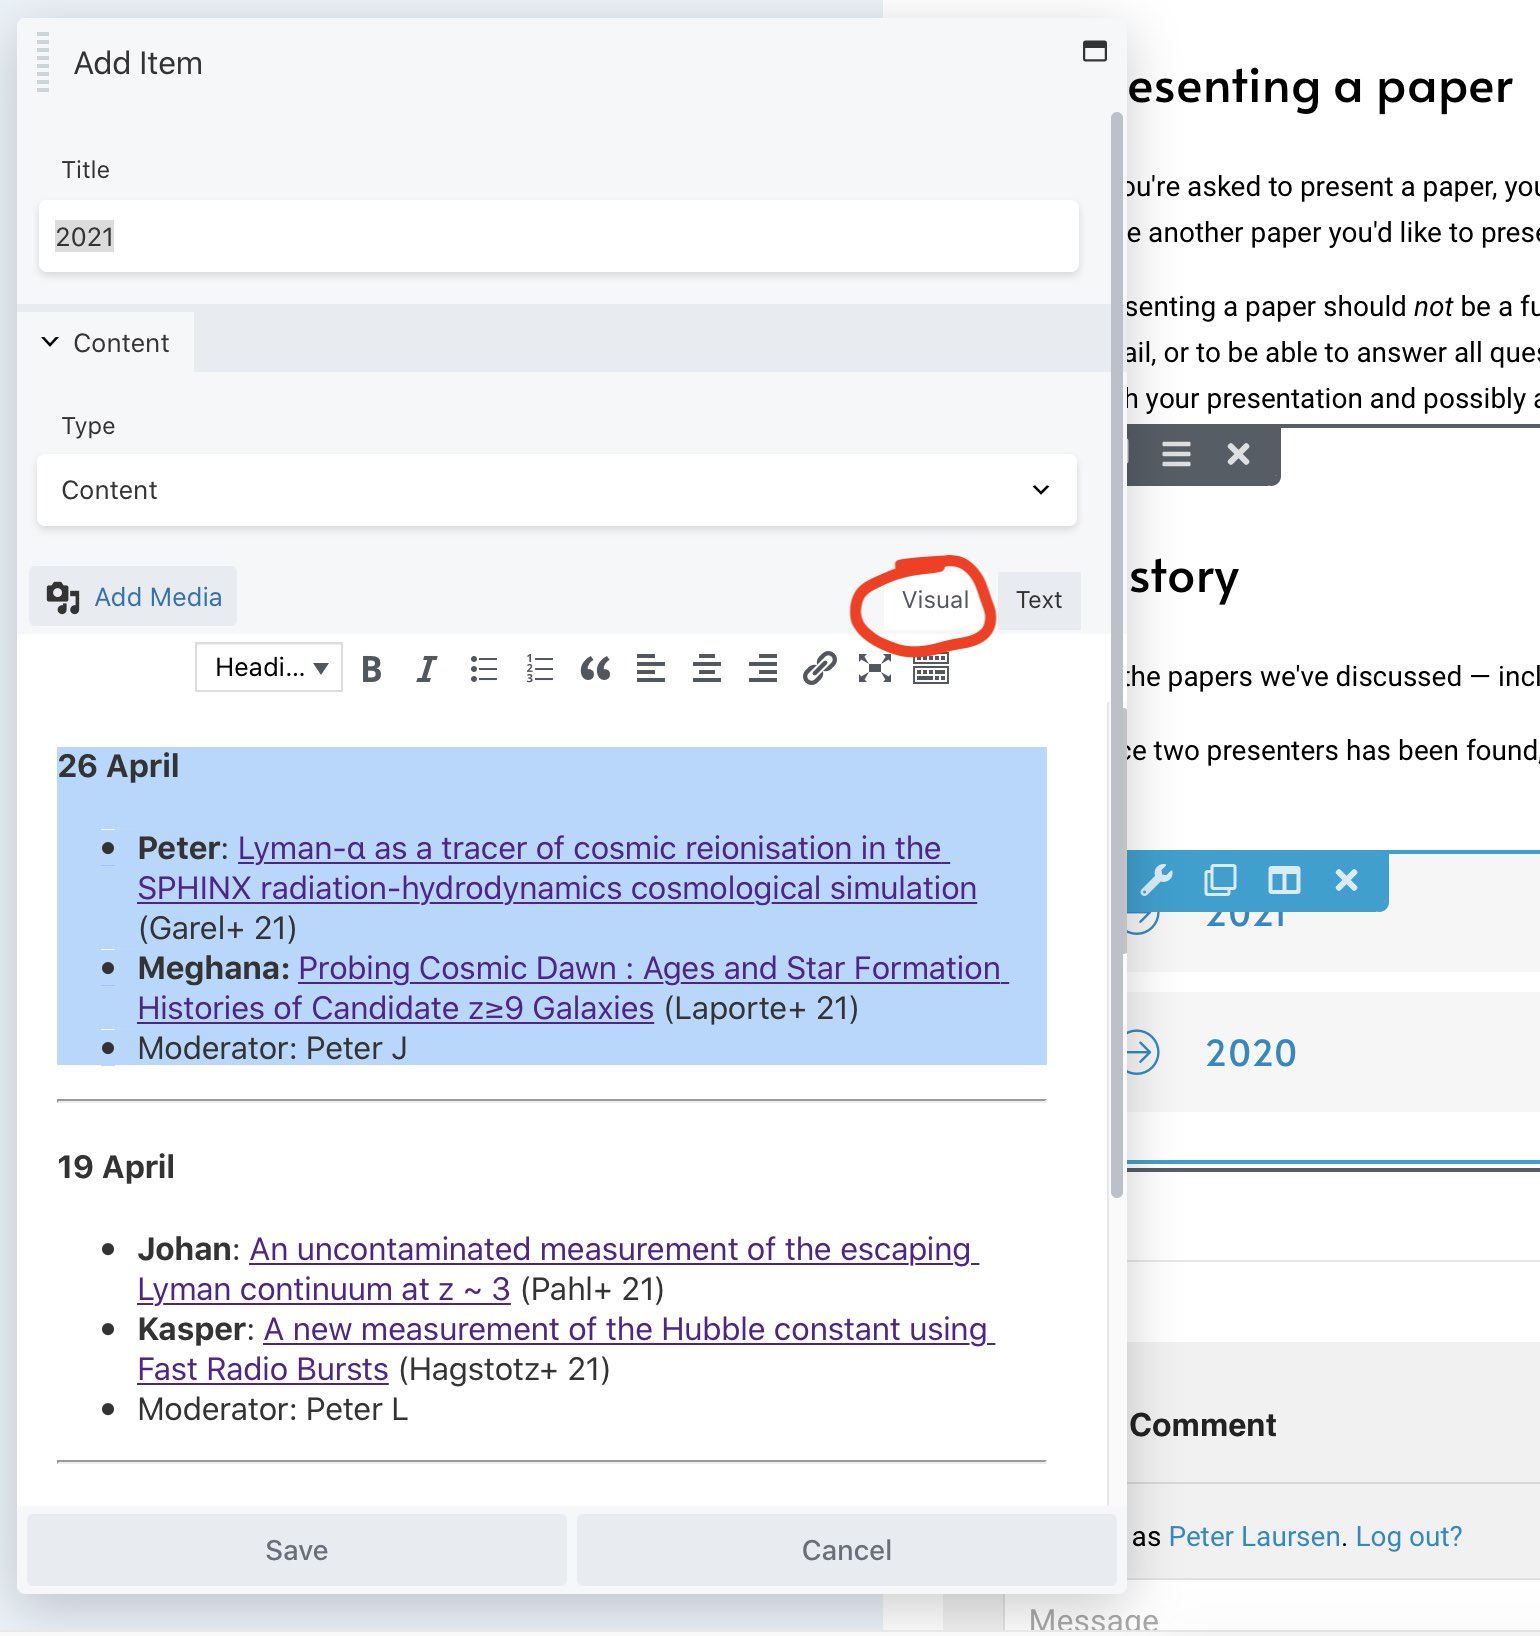
- Scroll down to the "History" section and click the module containing the accordions (the gray bars with blue text).
- In the popup, click "Edit item" under the current year.
- In the new popup editor, select the "Visual" tab.
- Highligt last week's papers (from the Date to the moderator name; this will include the separator bar.
- Copy, paste, and edit (you may need to remove the extra space).
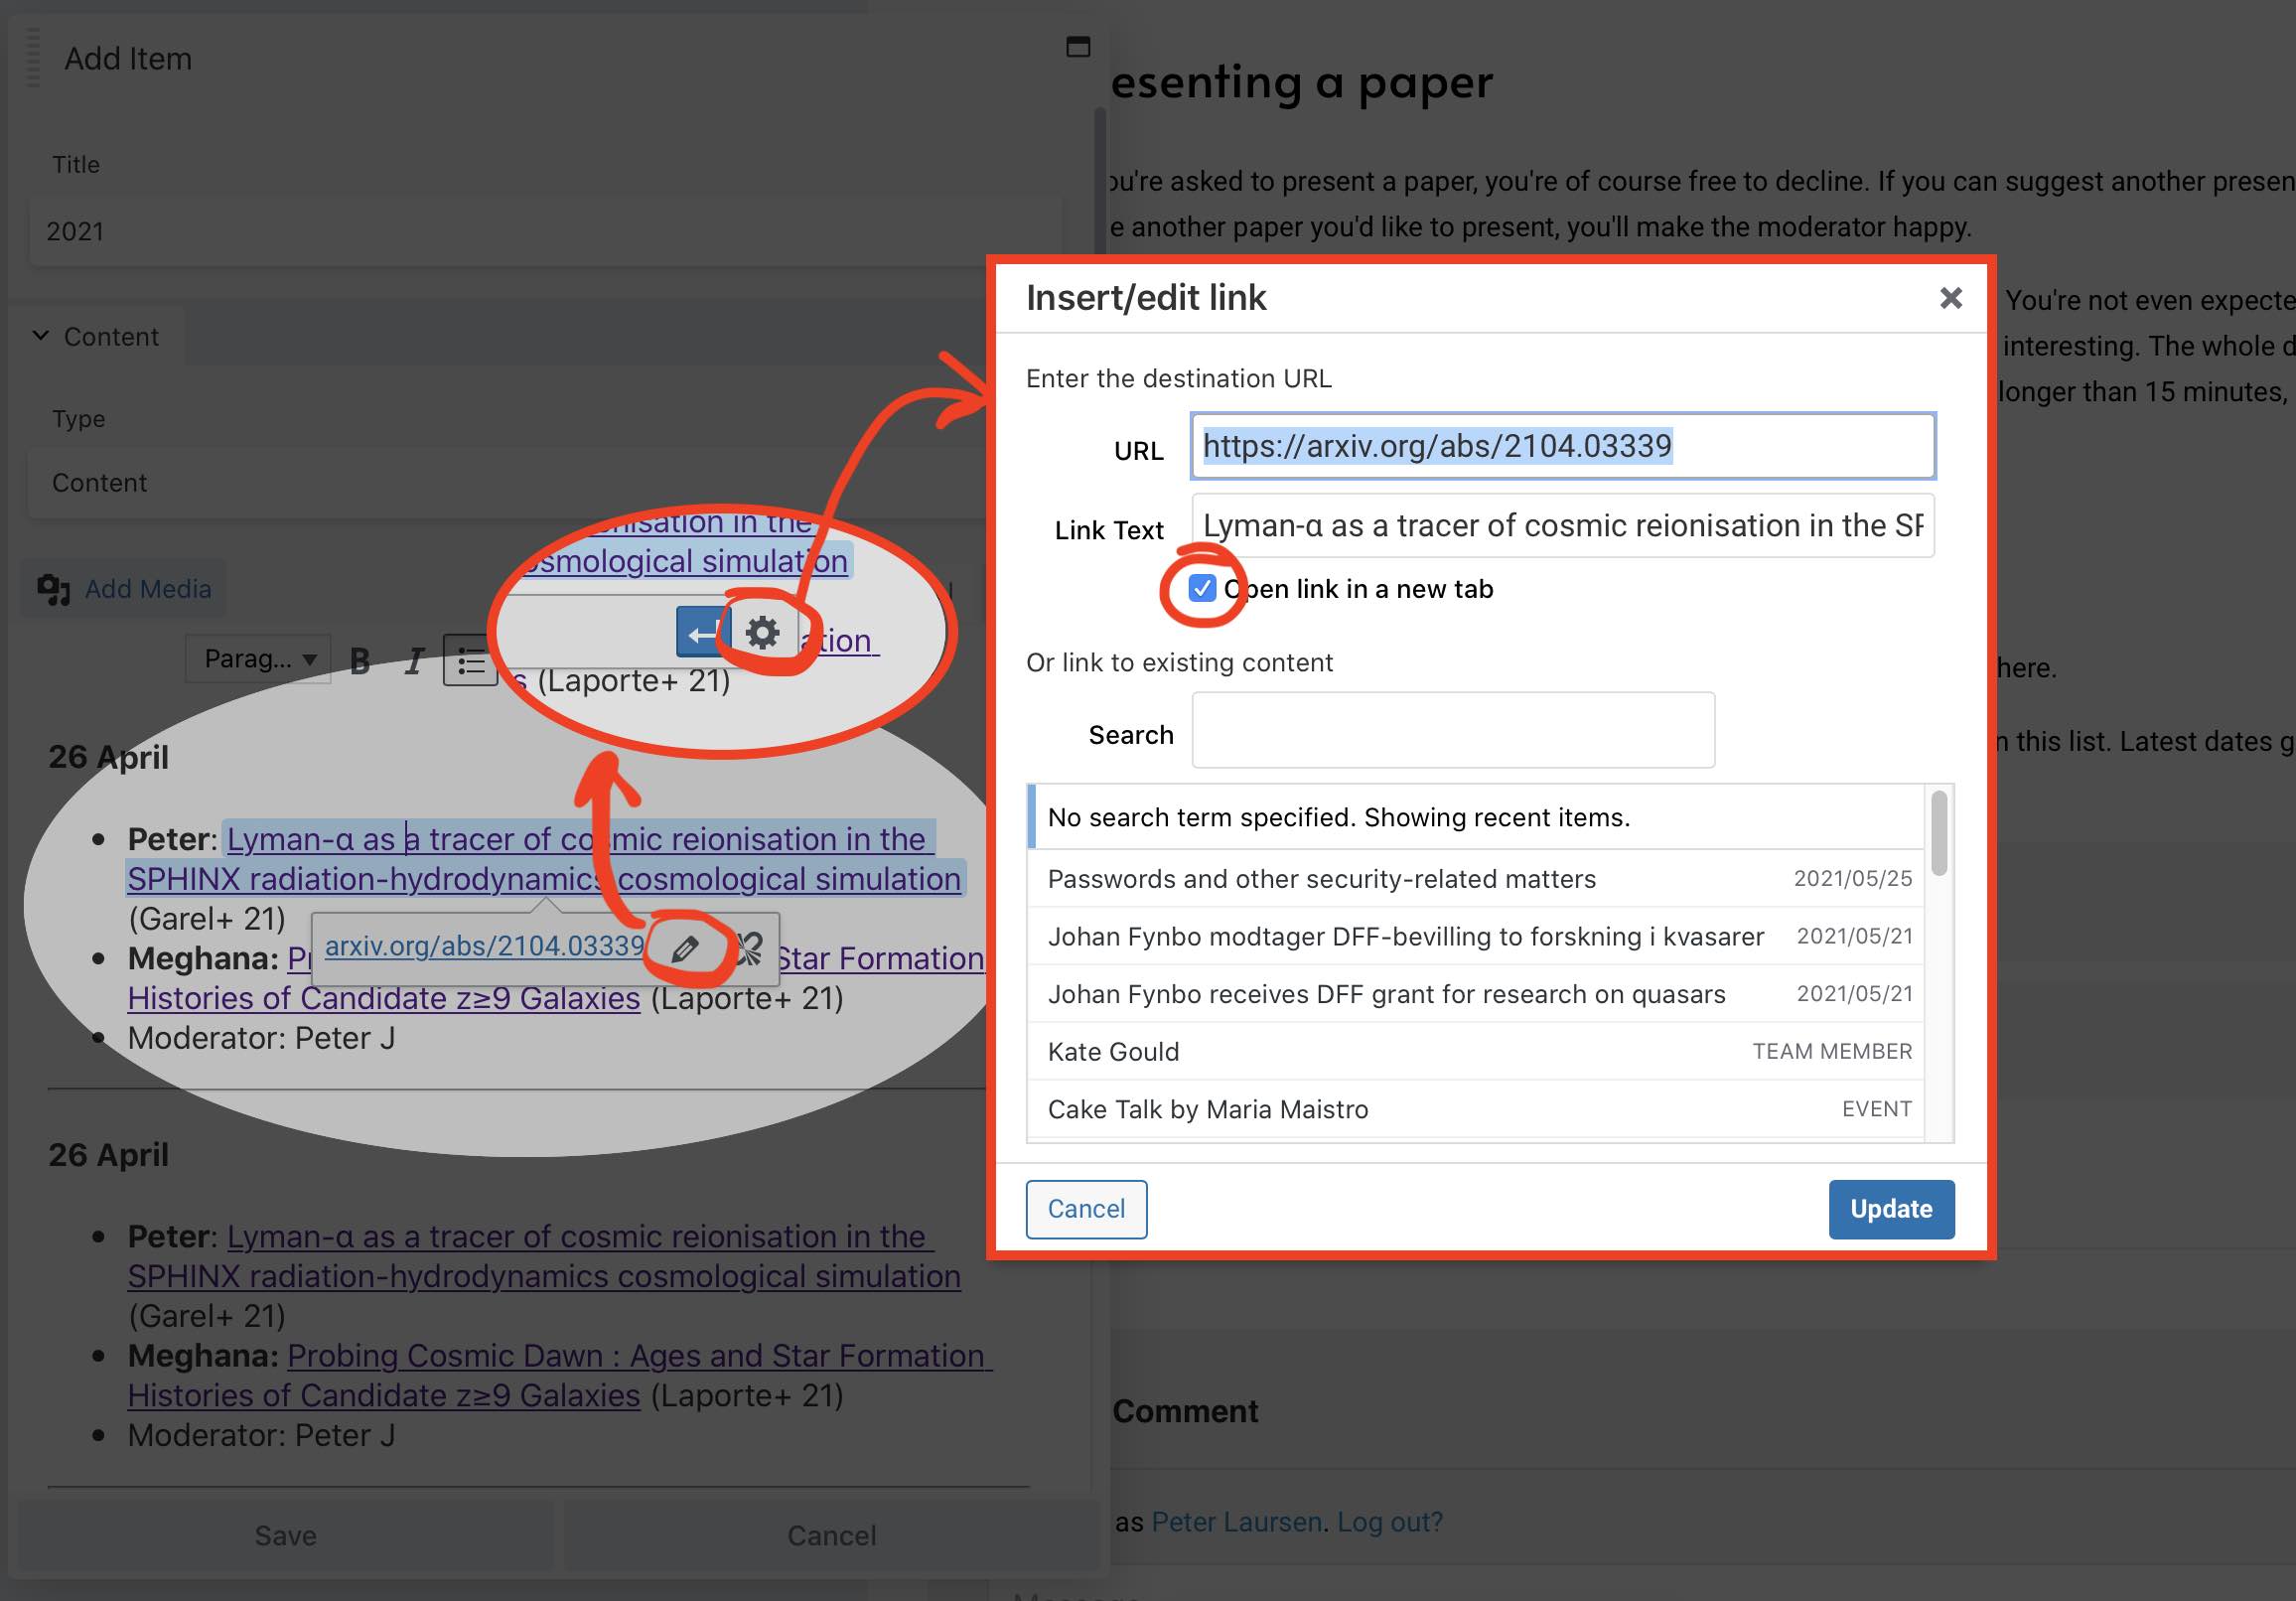
- To edit a link, click it, click the ⚙️ icon, and update the URL and text.
- Finally, you click
Save → Save → Done → Submit for Review
New page: Creating a page from scratch
You're welcome to create new pages on this site if you think something is missing. A guide will appear here at some point. Until then, the easiest way is to look for a page on the site which looks similar to what you have in mind, and then contact the admin. I can then create a template for you which you will be able to edit at your will.
News: Writing a story
News stories on the DAWN website are so-called posts which have the special Category "News from DAWN". Posts are at the heart of WordPress, and are what e.g. bloggers use for their entries. You can also subscribe to all posts if you have an RSS reader installed, using feed:https://cosmicdawn.dk/feed.
On this site, posts are used primarily for news stories and for wikiDAWN articles (see below). News stories automatically pop up on the front page, in the main section's "News" field.
To have a consistent layout for the news stories, both in terms of structure and in terms of fonts, font sizes, etc., please follow these three steps:
1. Duplicate the template
In your dashboard's left menu, click Posts.
This will show you the list of all posts. Locate the one called
News story template — Draft
Hovering over this post, click Duplicate. This will open up a duplicate of the template in the WordPress Editor.
2. Edit meta-information
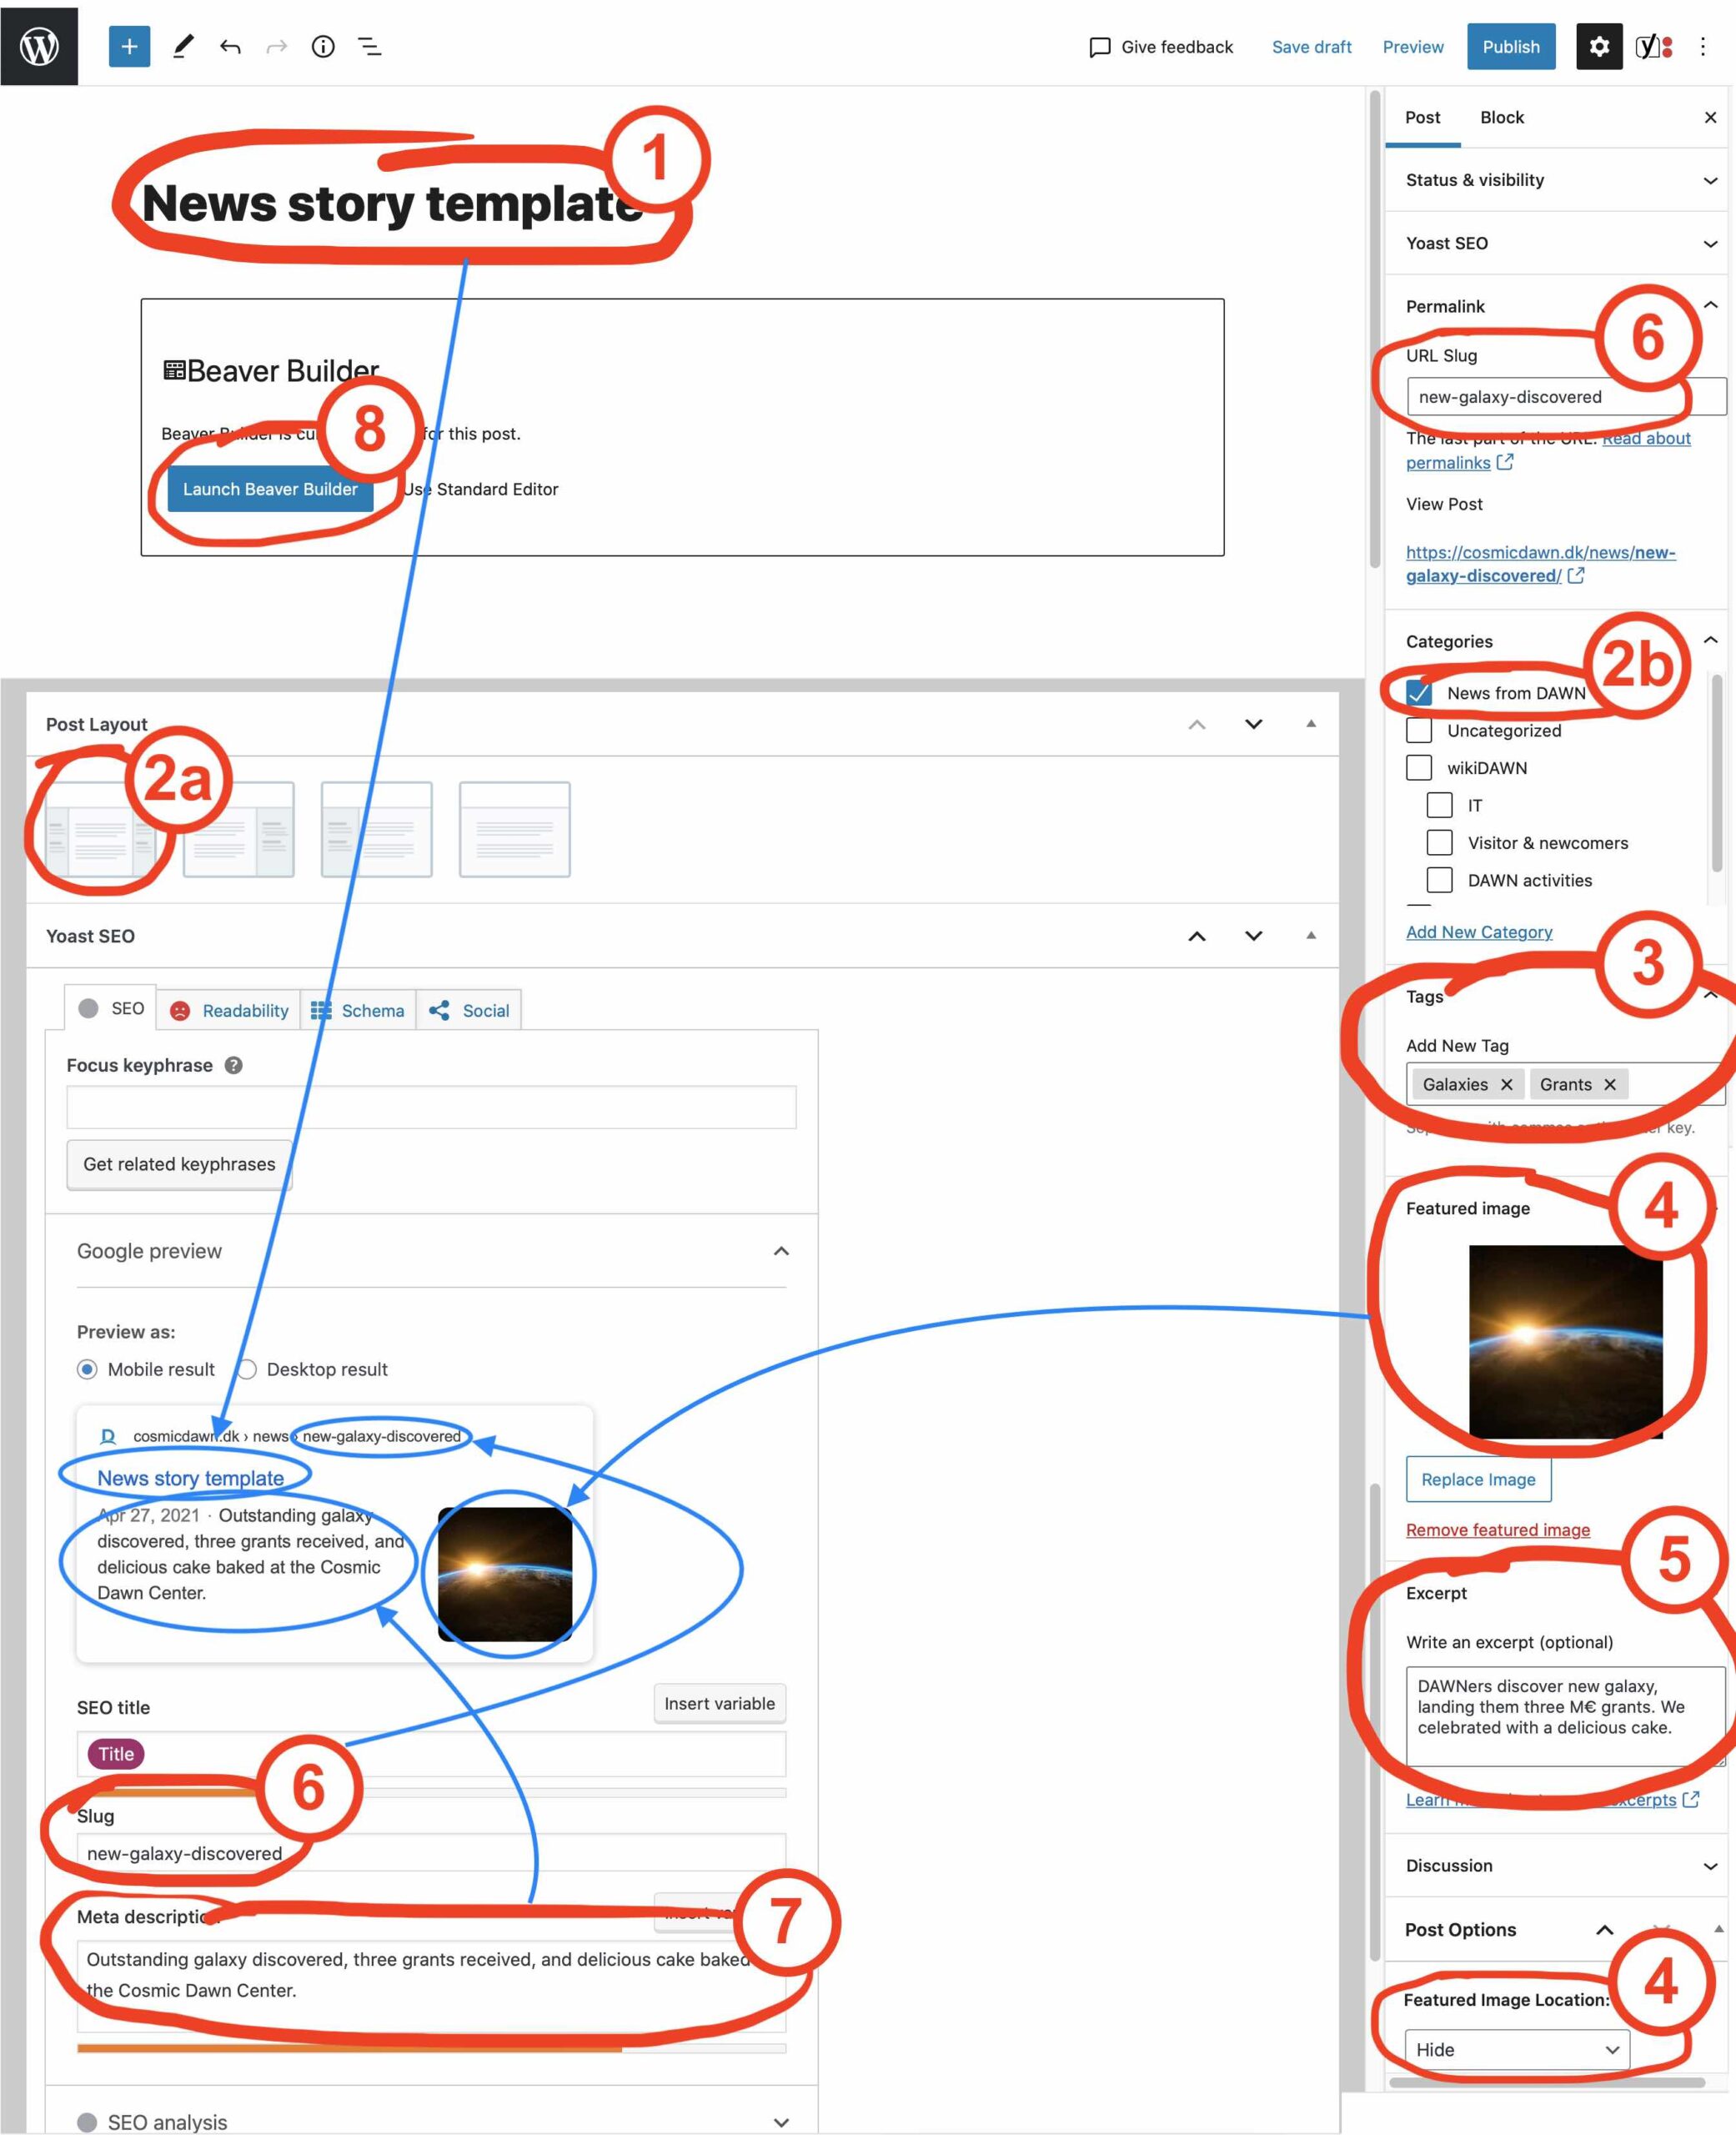
In the WordPress editor, you should follow this list to add meta-information. The numbers in this list correspond to the numbers in the image below the list.
- Edit the post title.
- This is the title shown in the list of news, and it's also the title shown in a Google search. It doesn't have to be the same as the title of your story, but should be related; e.g. a shorter version.
- Check that
- a) the Post Layout has both a right and and left column, and
- b) its Category is "News from DAWN". If you're writing a Danish story, choose "News in Danish". If there's also an English version (there should be), please de-select "News from DAWN" so that both don't show up in the news list — instead just link from the two to each other.
- Add tags.
- E.g. "Galaxies" and/or "Grants & awards". Just start typing, select old tags, or add your own. These are used to link posts together.
- Change the Featured Image.
- Like the post title, the "featured image" is shown in the list of news, and is also the image that will show up in a Google search.
- Further down (4b), make sure that the Featured Image Location is set to "Hide".
- Write an excerpt.
- This is the text shown in the list of news, but not in a Google search. If you don't write anything, it will automatically use the first 30 words.
- Edit the URL slug.
- The "slug" is the last part of the URL. For searching purposes, it's a good idea to make this the same as the title, but with hyphens instead of space. You can edit the slug in two different places.
- Write a meta description.
- This is what is shown in a Google search. It could be the same as the excerpt, but doesn't have to.
- You're now ready to add your content.
Hit Launch Beaver Builder to open your post in the Beaver Builder page builder.
3. Write the content
The content of your story is edited not in the built-in WordPress editor, but in the more versatile "Beaver Builder" drag-and-drop page builder.
There are a multitude of cool options with Beaver Builder. If you're happy with the look of the template, all you need to know is that modules (text boxes, images, etc.) can be duplicated, deleted, moved around, resized, and (most importantly) edited.
If you want more features (interactive info boxes, buttons, accordions, etc.), you can take the ultra-quick guide in the top of this page.
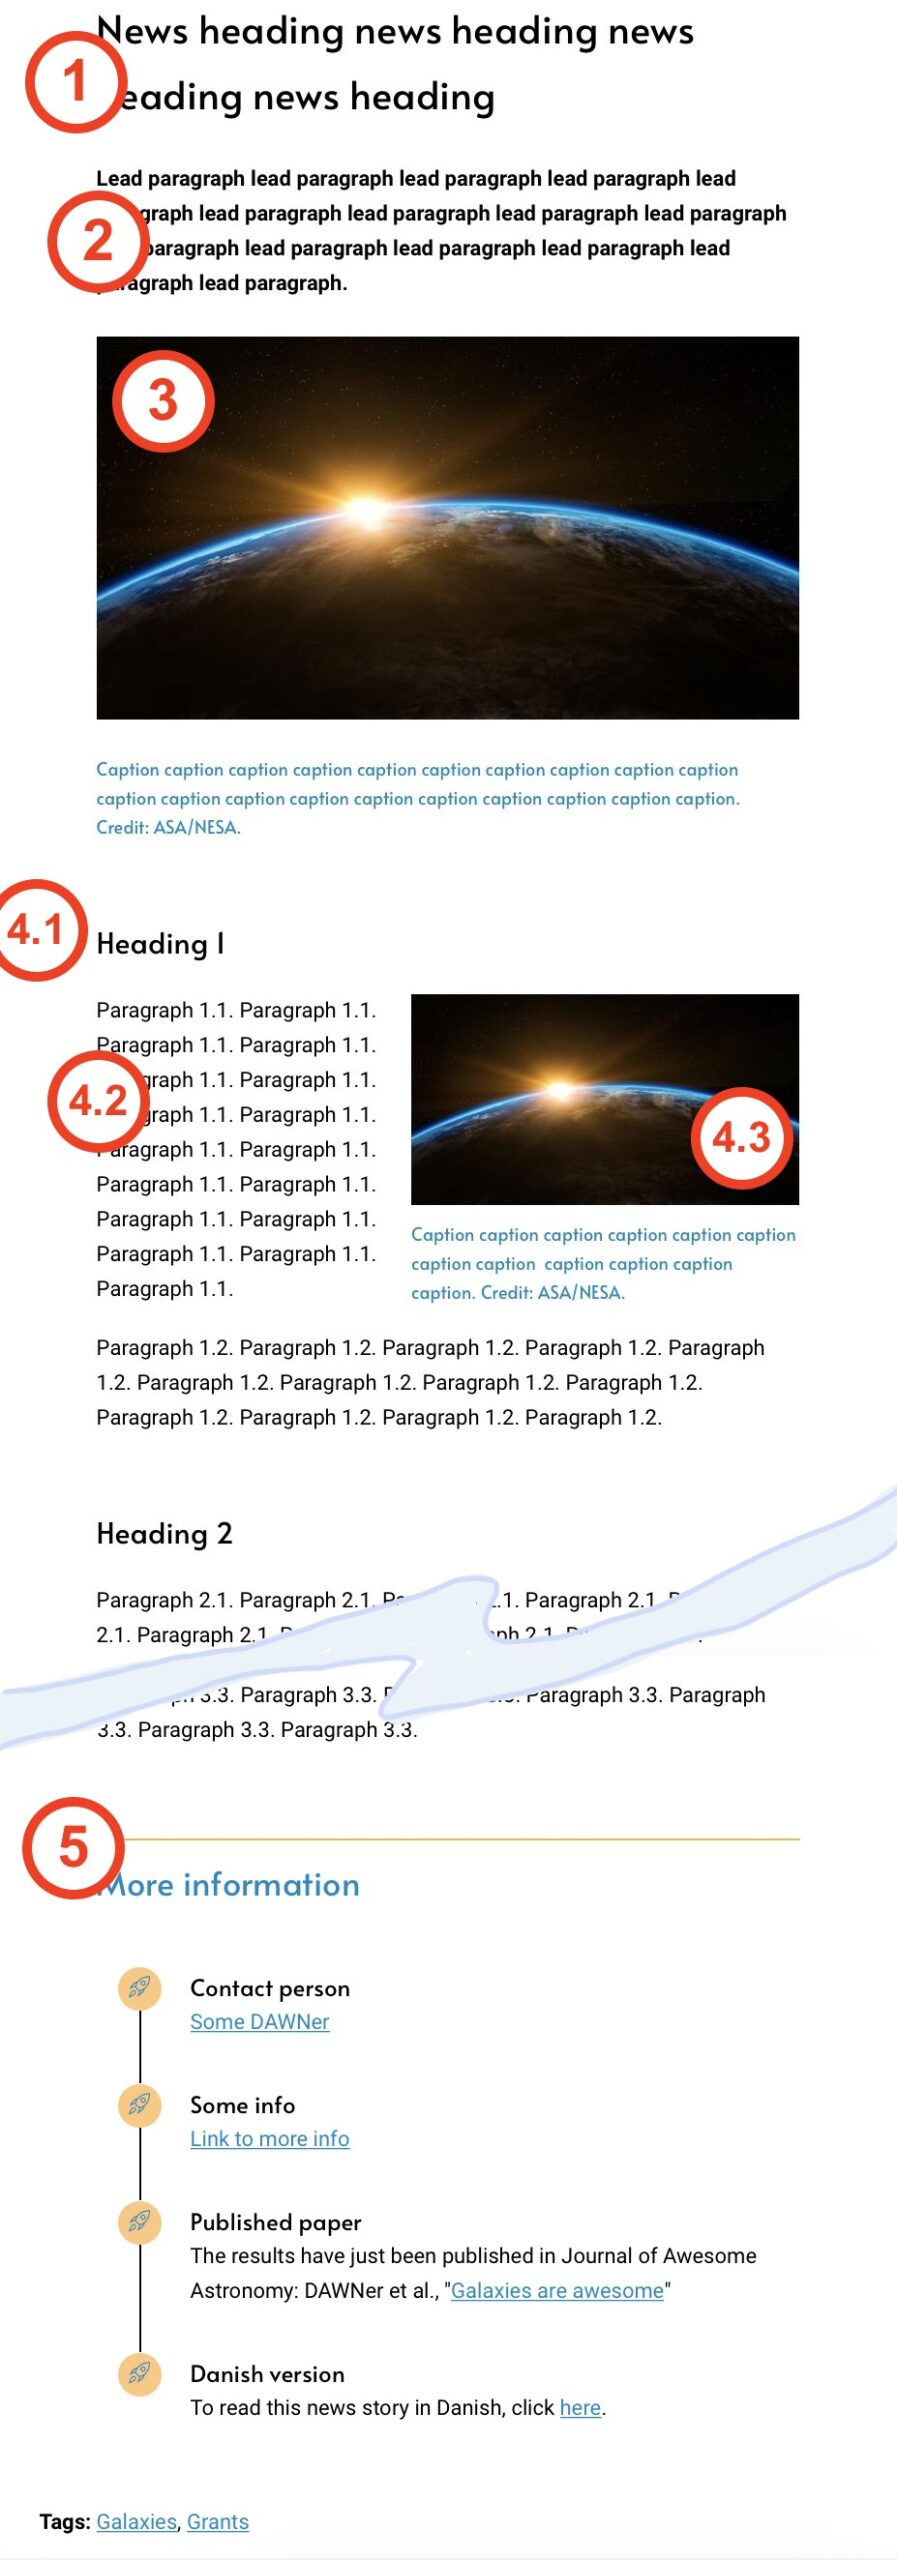
A news story should consist of
- Title
- Lead paragraph (Danish: "manchet")
- Main image
- Image caption
- A number of sections, each consisting of
- Heading
- A number of paragraphs, each consisting of a few (!) sentences
- Possibly an image with caption.
- The image can either fill the whole width, or it could be wrapped in the text (for small images).
- Possibly a final section with links for more information.
Text editor
Clicking a text box opens the text editor. Here, you'll have the option of editing in "Visual", where you can click buttons to emphasize text, add links, etc, or you can edit in "Text", where you can use html syntax.
Once you're happy with your story, you click
Done → Submit for Review
in the upper right corner and wait for your post to be accepted by an admin.
Outreach: Listing a contribution
Please add your media appearances, popular science articles, and other outreach activities to the site.
A guide will appear here at some point. Until then, you can just contact the admin and have them do it for you.
wikiDAWN: writing an article
wikiDAWN articles on the DAWN website are so-called posts, with the "wikiDAWN" category. Additionally, in order to sort the articles and for your article to appear on the wikiDAWN main page, add a sub-category. For example "IT" and "Newcomers & Visitors" are two of the sub-categories you can choose between.
On this site, posts are used primarily for news stories and for wikiDAWN articles. wikiDAWN articles automatically appear in their relevant categories on the wikiDAWN front page.
We would like the wikiDAWN articles to have a consistent layout, both in terms of structure and in terms of fonts, font sizes, etc. The easiest way to create a wikiDAWN article is the following:
Duplicate the template
In your dashboard's left menu, click Posts.
This will show you the list of all posts. Locate the one called
WikiDAWN Article Template — Draft
Hovering over this post, click Duplicate. This will open up a duplicate of the template in the WordPress Editor.
Be sure that you have duplicated the template, and that you are editing the duplicated version before you begin making any changes.
Editing meta-information
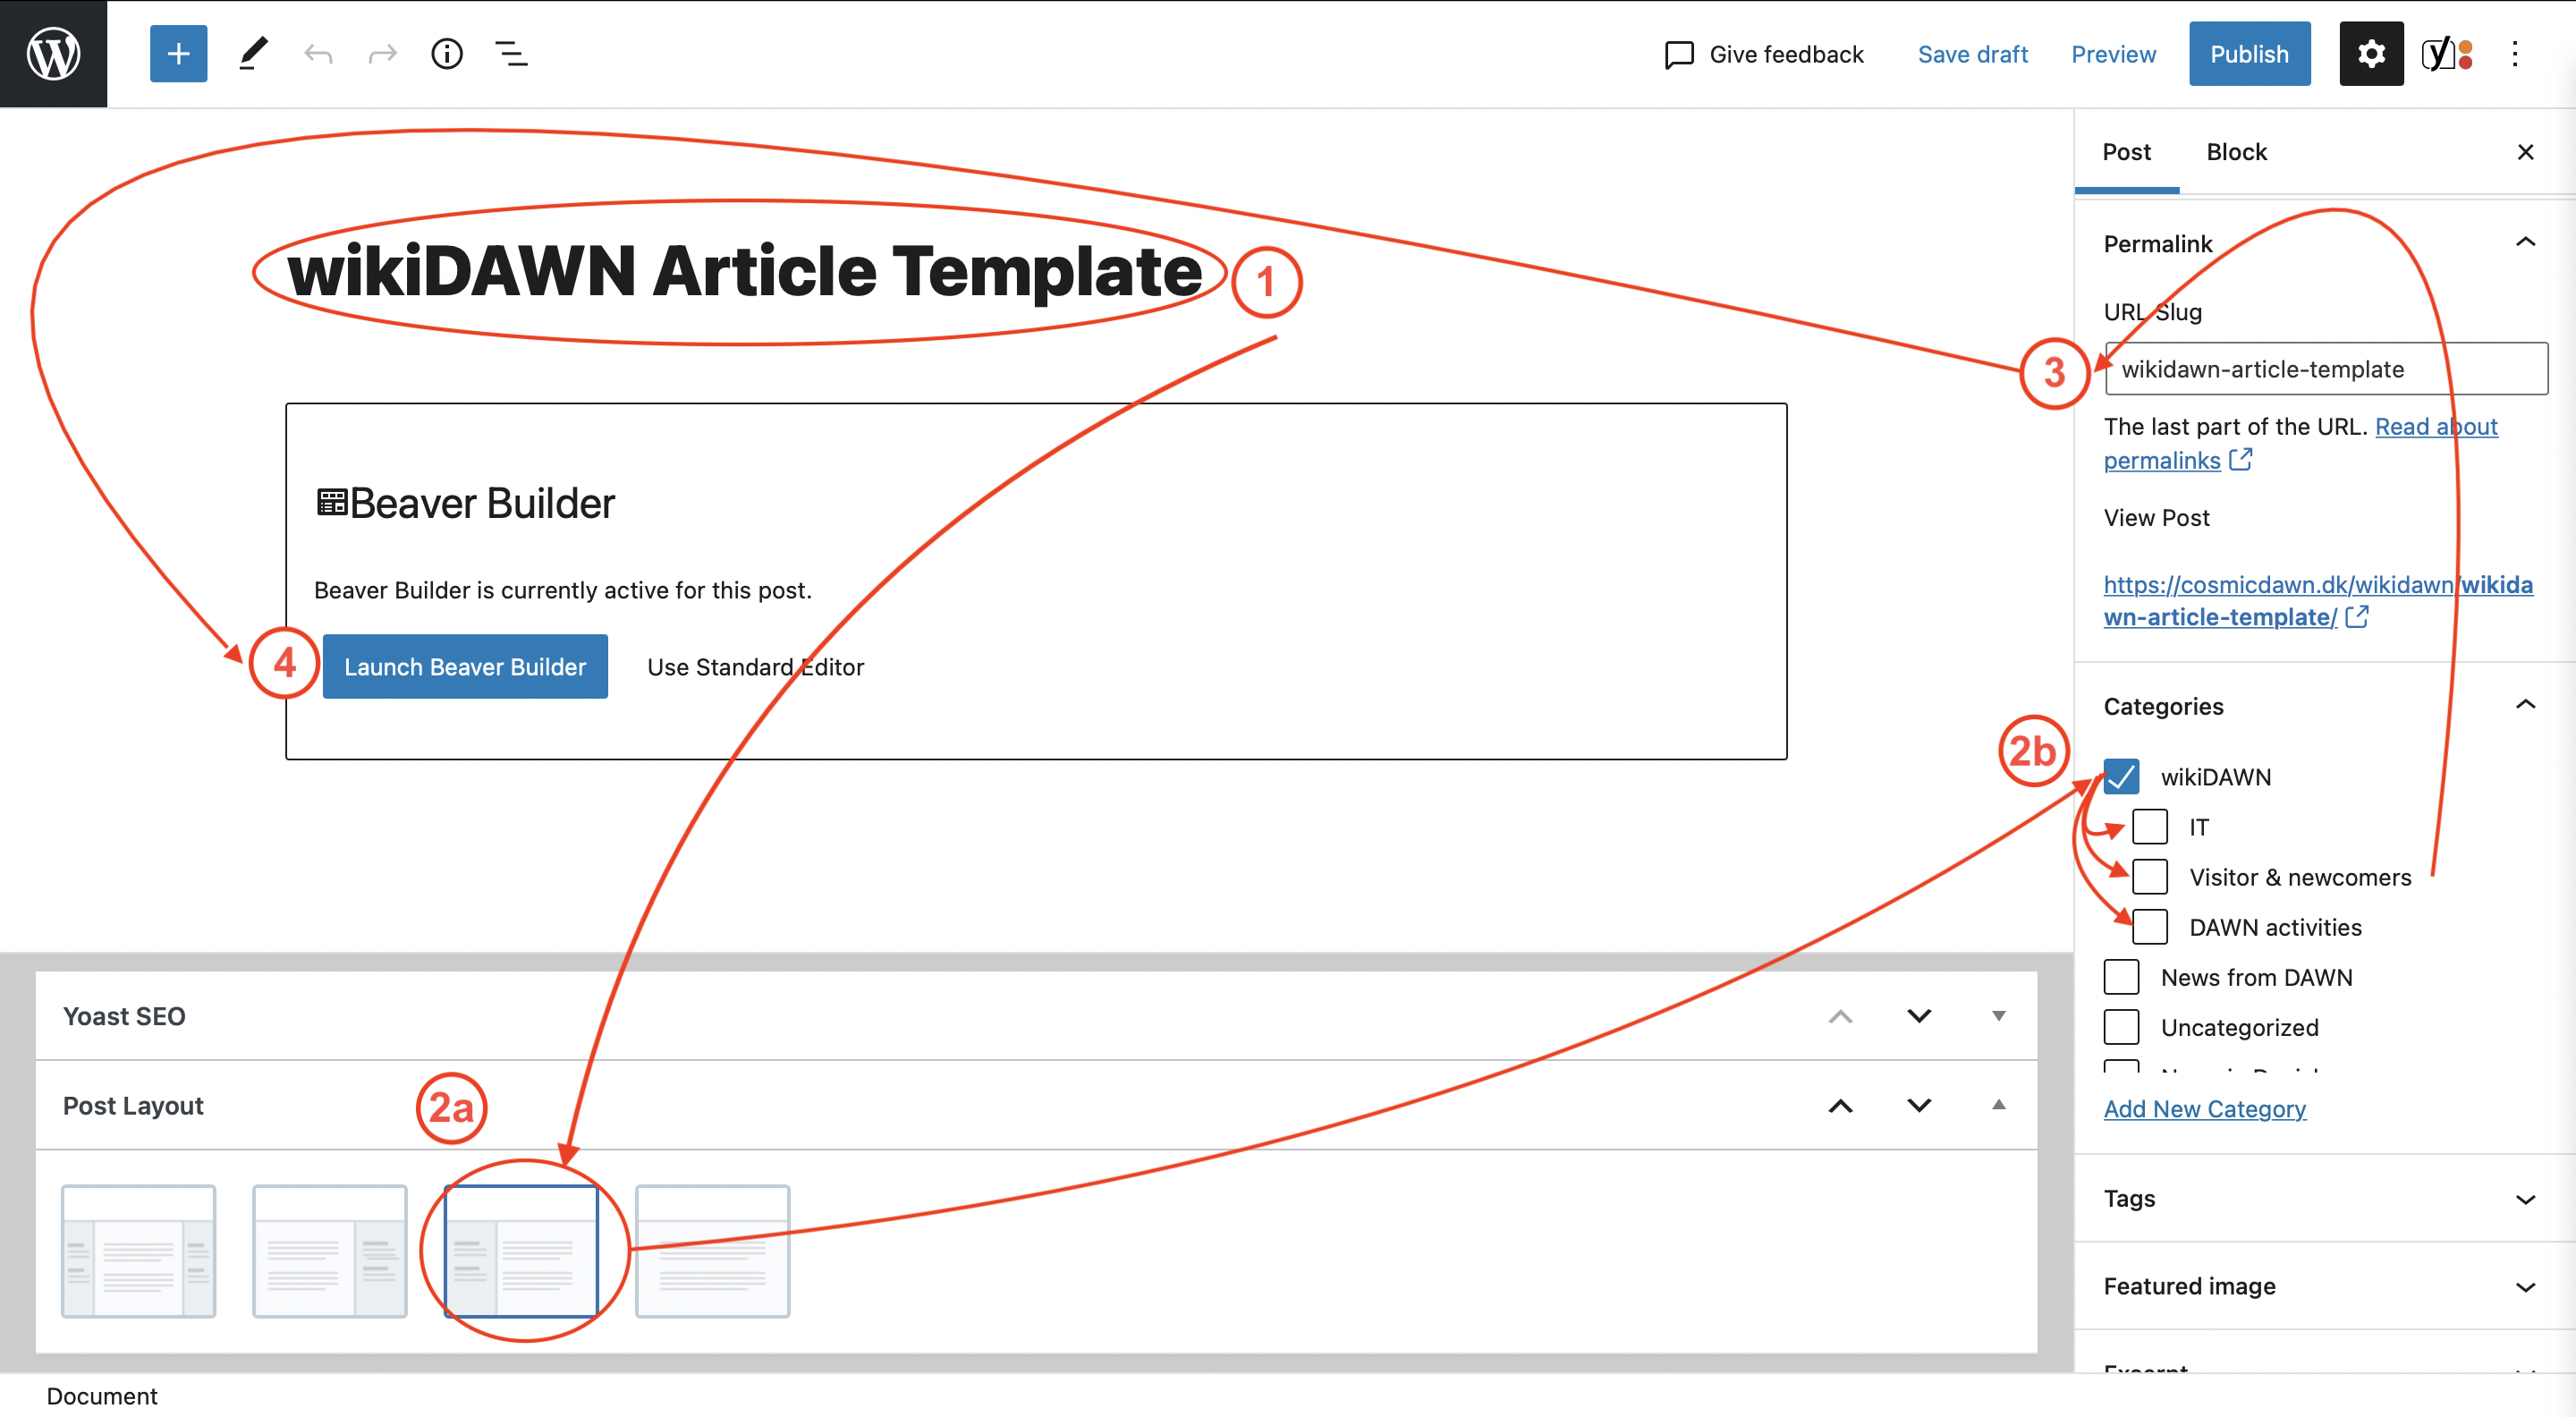
In the WordPress editor, you should follow this list to add meta-information. The numbers in this list correspond to the numbers in the image below the list.
- Edit the post title.
- This is the title shown in the list of news, and it's also the title shown in a Google search. It doesn't have to be the same as the title of your story, but should be related; e.g. a shorter version.
- Check that
- a) the Post Layout only has a left column, and
- b) its Category is "wikiDAWN". Additionally choose a relevant sub-category to make it easier to find you article. The sub-categories can be found under the wikiDAWN category; they are slightly indented.
- Edit the URL slug.
- The "slug" is the last part of the URL. For searching purposes, it's a good idea to make this the same as the title, but with hyphens instead of space. You can edit the slug in two different places.
- The URL is wikiDAWN/sub-category/your-slug, where "your-slug" is whatever you choose it to be.
- You're now ready to add your content.
Hit Launch Beaver Builder to open your post in the Beaver Builder page builder.
You can add meta-data to the article, in the Yoast SEO tab at the bottom of the page. This meta-data is for instance the excerpt that is shown in Google Search results. If you would like to add this to your wikiDAWN article, see the description under News: Writing a story.
Contents
You can now begin editing the contents of your wikiDAWN article.
Fancy Title
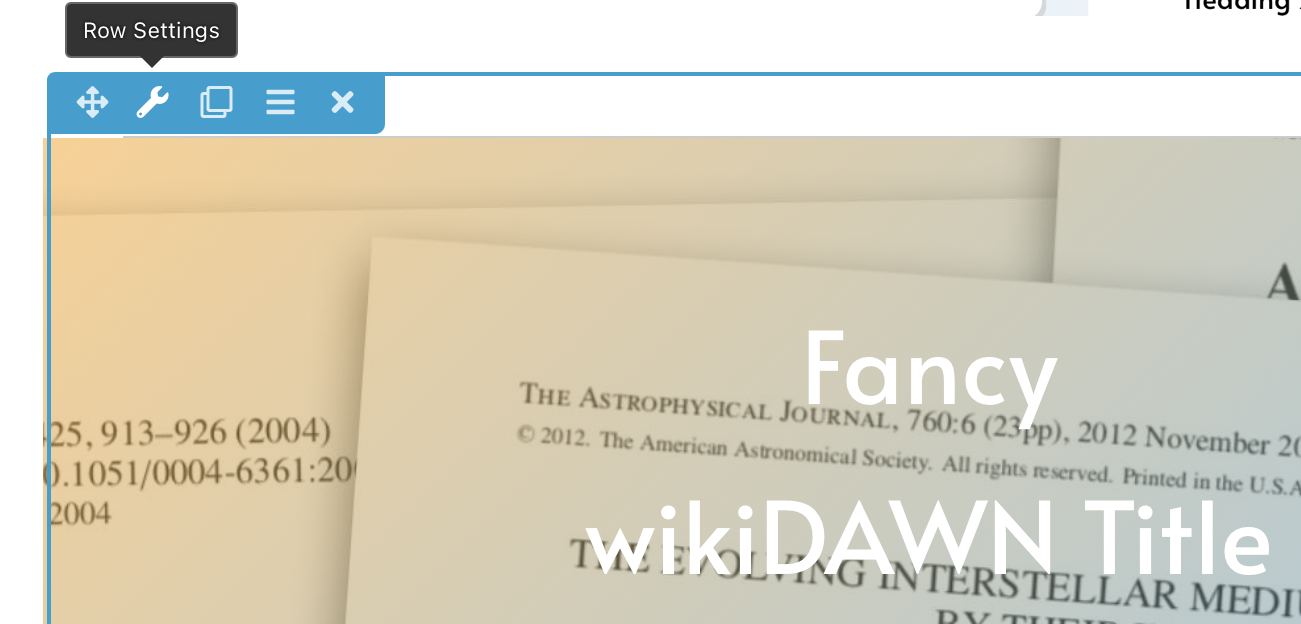
The template has a very basic heading, which is the standard heading we use for our wikiDAWN articles. However, we have provided an alternative, fancier heading where you can include a background picture of your choosing. If you wish to use this then enter Beaver Builder and;
- Remove the existing title from your page
- Click on the + in the top right corner, select "Saved" and drag-and-drop "Fancy wikiDAWN Title" to the top of your page.
- Click on "Row Settings" in the top left corner of the heading module and select "Style" in the popup window.
- Scroll down to "Background Parallax" and choose between different methods of selecting a background image; upload your own image, or select from our gallery.
Table of Contents
The template has a table of contents, which updates automatically, you add new sections, subsections etc. You can change the depth of the table of contents by clicking "Row Settings" for the table of contents, and choosing which heading types you would like to have included. If you plan only to write a very short article, then feel free to remove the table of contents – it can always be added again, if the article expands.
Now you can add content to the article. Use the header and text box that are in the template, and duplicate them if you need more boxes/headers. Delete any of the rows in the template that you would not like to use.
Text editor
Clicking a text box opens the text editor. Here, you'll have the option of editing in "Visual", where you can click buttons to emphasize text, add links, etc, or you can edit in "Text", where you can use html syntax.
Once you're happy with your article, you click
Done → Submit for Review
in the upper right corner and wait for your post to be accepted by an admin.
Tags: WordPress

